How to Integrate Google Analytics on your Next.js 13 App | Easy Guide
You don’t know how you can add google analytics on your next.js 13 app?? If your answer was YES you’re in the correct place, in the following paragraphs will se a simple guide of how to integrate google analytics, we’re gonna start creating a google analytics tag and then we are gonna go with with the next.js code.

Creating a Google Analytics Tag
The first step is to login in Google Analytics with your google account, then we need to Create an Account (if you already have an account, you click on Create Property), for this click in the settings button:


To get a google tag we need to follow these steps:

First: Give a name to the new account (just if you are creating a new one):

Second: You need to fill the information of the property:

Third: Describe your company, bussines, app, etc.

Fourth: Select the objectives of your business:

Fifth: You need to choose a platform:

Finally you need to fill some information about your app, after you fill these information you will get the google tag:


You will get your google tag and it looks somthings like this, copy this or keep it handy because we will used in our next code:
<!-- Google tag (gtag.js) -->
<script async src="https://www.googletagmanager.com/gtag/js?id=G-62343L7VGM"></script>
<script>
  window.dataLayer = window.dataLayer || [];
  function gtag(){dataLayer.push(arguments);}
  gtag('js', new Date());

  gtag('config', 'G-62343L7VGM');
</script>
Let’s Move on to the Next.js Code.
We’re gonna need to create 3 file to add google analytics into our Next.js 13 App.
Route: Root
.env.local

Route: Root
gtag.js

Route: app/GoogleAnalytics.jsx
GoogleAnalytics.jsx
First in the file .env.local we are gonna put your GA TRACKING ID in an environment variable:
//.env.local

NEXT_PUBLIC_GOOGLE_ID = G-62343L7VGM
Then in the file gtag.js we’re are gonna have the following code:
//gtag.js

export const GA_TRACKING_ID = process.env.NEXT_PUBLIC_GOOGLE_ID

export const pageview = url => {
  window.gtag("config", GA_TRACKING_ID, {
    page_path: url,
  })
}

export const event = ({ action, category, label, value }) => {
  window.gtag("event", action, {
    event_category: category,
    event_label: label,
    value: value,
  })
}
We have 2 function here:
- event: To events like add to cart, place order, etc.
- pageview: To navigating to different pages.
Now in the component Google Analytics.jsx we are gonna put the tag that google give us BUT not literally like that, we need to change the way we integrate the tag like we show in the following example:
// app/GoogleAnalytics.jsx

'use client'

import Script from "next/script"
import * as gtag from "../gtag.js"

const GoogleAnalytics = () => {

    //You can show in the console the GA_TRACKING_ID to confirm
    console.log(gtag.GA_TRACKING_ID)

    return (
        <>
            <Script
                strategy="afterInteractive"
                src={`https://www.googletagmanager.com/gtag/js?id=${gtag.GA_TRACKING_ID}`}
            />
            <Script
                id="gtag-init"
                strategy="afterInteractive"
                dangerouslySetInnerHTML={{
                    __html: `
                      window.dataLayer = window.dataLayer || [];
                      function gtag(){dataLayer.push(arguments);}
                      gtag('js', new Date());
                      gtag('config', '${gtag.GA_TRACKING_ID}', {
                      page_path: window.location.pathname,
                      });
                    `,
                }}
            />
        </>
    )
}

export default GoogleAnalytics
Finally we just need to import the component <GoogleAnalytics /> into our root layout:
// app/layout.jsx
import './styles/globals.css';
import GoogleAnalytics from './GoogleAnalytics';
export const metadata = {
title: 'GA | Next.js',
description: 'Google Analytics in Next.js 13',
}
export default function RootLayout({ children }) {
return (
<html lang="en">
<body>
//Here you put the component
<GoogleAnalytics />
{children}
</body>
</html>
)
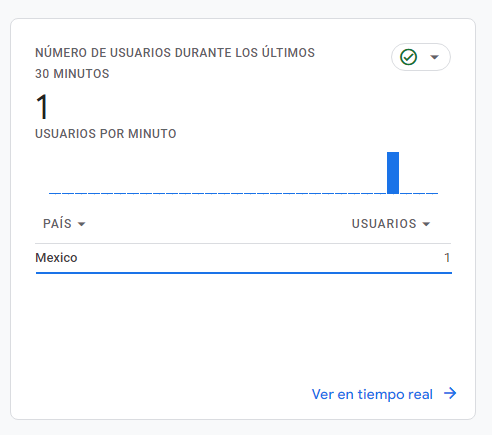
}We just need to see in the google analytics if it’s working correctly: